Light Blue Integration

Many of MachForm users are professional photographers and many are using Light Blue (a very popular studio manager software in the UK) to streamline their business.

Recently, Light Blue released a new HTTP API to let you send any data to your Light Blue account. This means that you’ll be able to link your forms to your Light Blue account seamlessly. Yay!

You’ll be able to:
[listarrow]

  • Create a new contact on your Light Blue using your form data
  • Create a new shoot record on your Light Blue using your form data

[/listarrow]

Find your Light Blue API Key

The first thing you need to do before proceeding with the integration is to generate/find your Light Blue API Key.

Login to Light Blue website, click My Account and then copy your existing API Key or click the create key button.

Your Light Blue API Key should be something like this:
7a40a241eacd035d442ca7299cvgba12

Linking your forms to the Light Blue API

Let say you have a simple form that collect your client info and ask for shoot date:
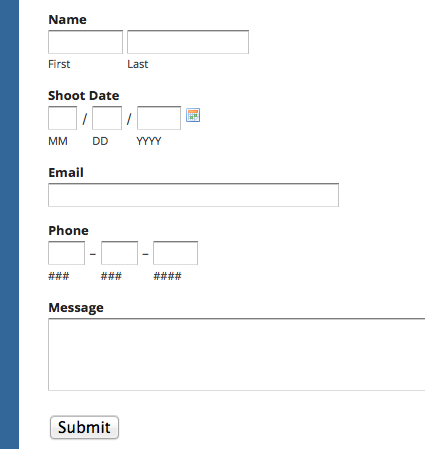
and you would like to send all the data collected there to your Light Blue account.

Simply go to your MachForm panel and click Notifications menu.

Click Send Form Data to Another Website option and then enter this URL into the Website URL:

https://online.lightbluesoftware.com/api.php

Leave other settings to use the current settings, like this:

At this point, you are halfway through. Your form now knows how to link to your Light Blue account.

Define Parameters

The next thing to do, you need to associate the fields in your forms with parameters that the Light Blue API recognizes.

To do this, you need to set the Parameter Name for each field on your forms, like this:
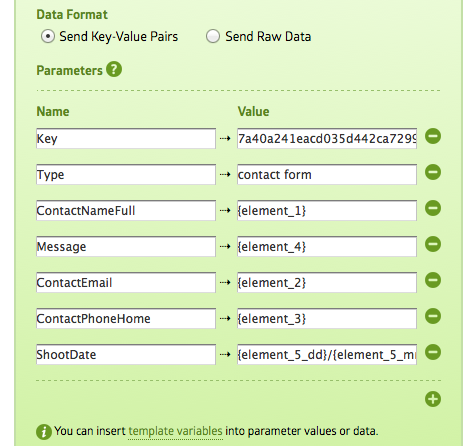
As you can see above, the Parameters section contain two columns (Name and Value). The first column (Name) is the record name within your Light Blue account, while the second column (Value) is the template variable name of your form fields that being sent to Light Blue.

Write all those Name records, exactly as shown above (Key, Type, ContactNameFull, etc).

While the record on the second columns (Value), you’ll need to replace them with your own form fields template variables and API key. Replace the value of the Key with your own API key, while the value of Type should always use “contact form“.

The rest of the values ({element_1}, {element_2}, etc) should be replaced with your form fields template variables.

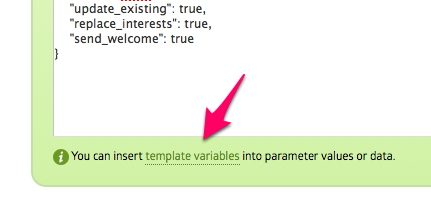
To get the template variables of your fields, click the template variables link at the bottom of the page.

Shoot Date

Amongst those parameters, you’ll notice that the template variables for the ShootDate is different. The ShootDate is basically the session date and by default Light Blue accept the date using dd/mm/yyyy format.

To send the date using the above format, you’ll need to get the template variable for the date field on your form, particularly for each date parts. And then merge those template variables using slash characters, like this:

{element_5_dd}/{element_5_mm}/{element_5_yyyy}

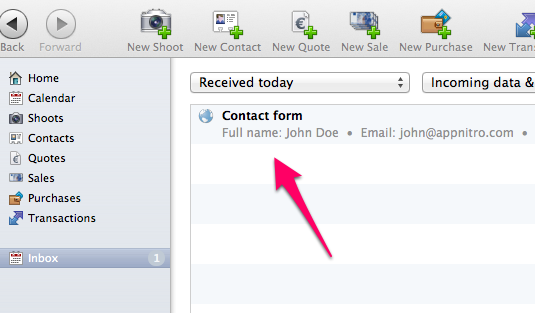
and that’s it! Save those settings and test submitting your form. Once your Light Blue software being synched, you should see the data in the Inbox:
Parameters List

To make it easier for you, below is the parameters being used within the example previously. Simply copy and paste the parameters name.

[listarrow]

  • Key
  • Type
  • ContactNameFull
  • Message
  • ContactEmail
  • ContactPhoneHome
  • ShootDate

[/listarrow]

The only required parameters are Key and Type, others are optional. So let say you only need to collect your client name and email, without the need to get the shooting date, then you’ll only need to use Key, Type, ContactNameFull and ContactEmail.

The full list of supported parameters is available directly on Light Blue API documentation page.

If you need any help with the above, please feel free to contact us! We’ll help you 🙂

MailChimp Integration

One of the new feature within version 4 is the ability to send your form data to another website. In this article, we’ll show you how to integrate your form with MailChimp.

Basically, using this new webhook feature, you’ll be able to call any MailChimp API to do the tasks you need.

Some common integrations are:
[listarrow]

  • Add a new subscriber to a list of your choosing
  • Unsubscribe an email address from a list of your choosing
  • Edit the email address, merge fields, and interest groups for a list member
  • Create a new draft campaign to send
  • Delete a campaign

[/listarrow]

Find your MailChimp API Key

The first thing you need to do before proceeding with the integration is to generate/find your MailChimp API Key.

Login to your MailChimp panel, click Profile ⇢ Account Settings ⇢ Extras ⇢ API Keys and then copy your existing API Key or click the Create a Key button.

More detailed instruction (video) also available on MailChimp help page.

Your MailChimp API Key should be something like this:
1644b44d50bcc02f6f789aaf324f82ec-us4

Find your MailChimp URL (API Endpoint)

The next thing you need is your MailChimp URL (API Endpoint). MachForm will be using this URL to submit your form data to your MailChimp account.

The generic format for your MailChimp URL is like this:

https://XXX.api.mailchimp.com/2.0/

where XXX should be replaced with the portion after the dash in your API Key. e.g. “us1”, “us2”, “uk1”, etc. A solid example – say your API Key is 1644b44d50bcc02f6f789aaf324f82ec-us4.

Then your MailChimp URL would be:

https://us4.api.mailchimp.com/2.0/

We’ll be using the above URL as the base part of any other URLs, since each task will have its own specific URL.

Add a new subscriber to a list of your choosing

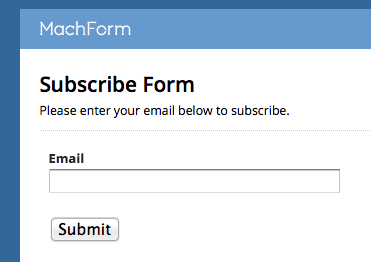
Let say you have a simple form with only one email field:

and you would like to add the email address entered by your users into your MailChimp list named Subscriber List.

Simply go to your MachForm panel and click Notifications menu.

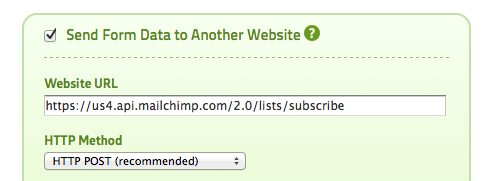
Click Send Form Data to Another Website option and then enter this URL into the Website URL:

https://us4.api.mailchimp.com/2.0/lists/subscribe

Note that the URL above is basically using your MailChimp URL, with the addition of lists/subscribe at the end of it. Make sure to use your own MailChimp URL.

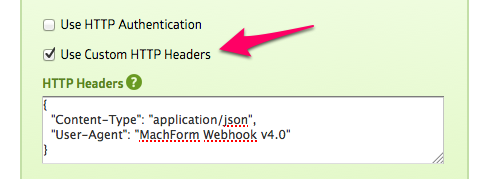
Check the Use Custom HTTP Headers and paste this code:

{
"Content-Type": "application/json",
"User-Agent": "MachForm Webhook v4.0"
}

like this:

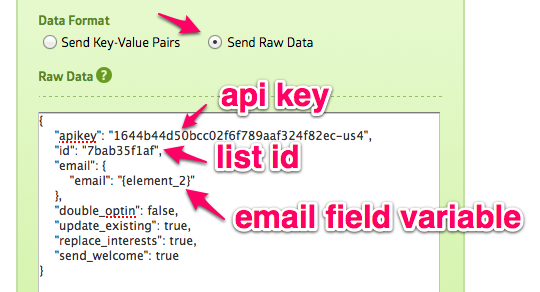
Then select Send Raw Data and paste this code:

{
"apikey": "1644b44d50bcc02f6f789aaf324f82ec-us4",
"id": "7bab35f1af",
"email": {
"email": "{element_2}"
},
"double_optin": false,
"update_existing": true,
"replace_interests": true,
"send_welcome": true
}

like this:

Note that the code above need to be adjusted with your own API Key, List ID and the template variable of your email field.

To get the template variable of your email field, simply click the template variable link at the bottom of the page:

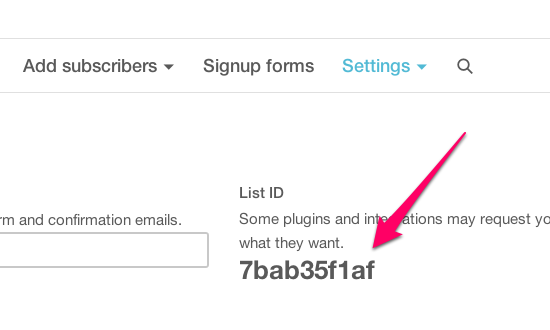
To get your List ID, go to your MailChimp account, click Lists and select the list name you would like the form to send the data into. Click Settings ⇢ List Name and Defaults and you’ll find your List ID:

and that’s it. Save the settings and test by submitting your form. The email address will be automatically added to the list you choose on your MailChimp account.

Unsubscribe an email address from a list of your choosing

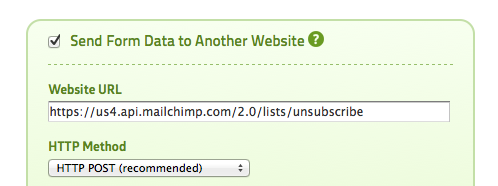
Creating unsubscribe form is pretty much the same as the subscribe form above (#1). The only thing different are the Website URL and the Raw Data.

You should use this URL to unsubscribe:
https://us4.api.mailchimp.com/2.0/lists/unsubscribe

Note that the URL above is basically using your MailChimp URL, with the addition of lists/subscribe at the end of it. Make sure to use your own MailChimp URL.

Check the Use Custom HTTP Headers and paste this code:

{
"Content-Type": "application/json",
"User-Agent": "MachForm Webhook v4.0"
}

like this:

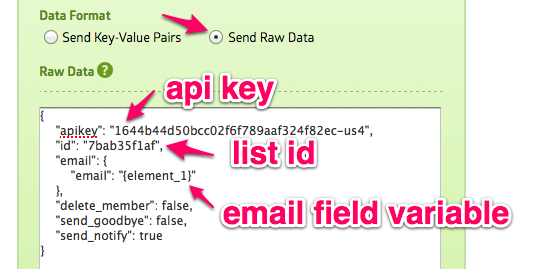
Then select Send Raw Data and paste this code:

{
"apikey": "1644b44d50bcc02f6f789aaf324f82ec-us4",
"id": "7bab35f1af",
"email": {
"email": "{element_1}"
},
"delete_member": false,
"send_goodbye": false,
"send_notify": true
}

like this:

Note that the code above need to be adjusted with your own API Key, List ID and the template variable of your email field.

Other possible integrations

There are lots other thing you can do with your form and MailChimp. You might want to take a look into MailChimp API Documentation page.

Find the method you would like to implement and paste the code into the Raw Data section as above. Enjoy!